Testing Supabase Magic Login in CI with Playwright
I’m a bit of a perfectionist when it comes to my side projects. I’ve been playing around with little hobby app using SvelteKit and Supabase. One thing I don’t compromise on is automated tests. Not only does it keep me honest about writing good code, but it’s also a great excuse to play around with tools I don’t get to use at my day job.
Here’s how I tackled one particular challenge: getting authentication to work smoothly in my CI pipeline with GitHub Actions. The solution ended up being pretty elegant – I combined Supabase Local Development with Playwright to create a testing setup that actually works without jumping through hoops.
Requirements
You’ll need a Supabase app with Magic Login authentication set up. For this guide, I’m using the Supabase CLI to spin up a local database for CI instead of hitting a live Supabase instance. It’ll be helpful if you’ve worked with the Supabase CLI for local development before.
Supabase Local Development
The Supabase docs have a solid guide for getting Supabase running locally - check it out here. Once you’ve got the hang of it, fire up the local container for your app:
$ npx supabase start
Started supabase local development setup.
         API URL: http://localhost:54321
          DB URL: postgresql://postgres:postgres@localhost:54322/postgres
      Studio URL: http://localhost:54323
    Inbucket URL: http://localhost:54324 # keep a note of this URL!
      JWT secret: xxx
        anon key: xxx
service_role key: xxx
The key thing here is that InBucket URL - note it down somewhere. InBucket is basically an email catcher that grabs all the emails Supabase would normally send out to users. We’ll use it to snag the magic link or OTP that gets generated for our test user.
Installing Playwright
Playwright has a CLI installation tool, but please also feel free to refer to their documentation if you run into any issues or require a custom setup.
$ npm init playwright@latest
We can check Playwright’s generally working by running their example tests:
$ npx playwright test
Configuring Playwright
This solution requires a little custom Playwright configuration. Playwright needs
to know the URL for the InBucket server that Supabase gives us. I chose to add
this to a .env file, and to ensure the Playwright runner can see it, I used
dotenv and loaded it in my
playwright.config.ts.
Your Playwright configuration should look something like this:
import dotenv from 'dotenv'
import type { PlaywrightTestConfig } from '@playwright/test'

dotenv.config()

const config: PlaywrightTestConfig = {
  webServer: {
    command: 'npm run build && npm run preview',
    port: 4173,
  },
  testDir: 'tests',
  // we'll be creating this file shortly
  globalSetup: './tests/global-setup.ts',
  use: {
    // this is where we'll cache the user's session across tests 😄
    storageState: 'storage-state.json',
  },
}

export default config
Writing the global setup function
Here’s where things start to get a bit messy! One of the benefits of using magic login links is that the user doesn’t need to remember a password or enter it on your app. The lack of a password means we can’t seed a test user with a password and use that to authenticate in each test.
Supabase Magic Login will email the user a login link, optionally with a one-time passcode (OTP). We need to capture these details and use them in our setup function to complete the login process.
We’ll start by writing the steps to trigger a magic link email. My login form behaves as follows. If your login form behaves differently, update the UI selectors as we go.
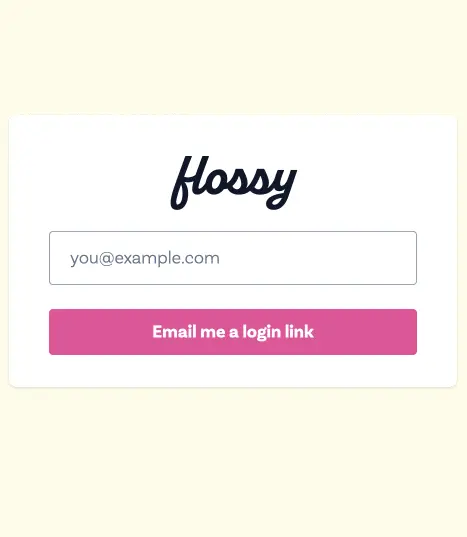
Here is the function which allows us to select the email address field, enter a value and then submit the form.
import { chromium, type FullConfig } from '@playwright/test'

async function globalSetup(config: FullConfig) {
  const browser = await chromium.launch()
  const page = await browser.newPage()
  // replace this URL with the address your local app runs on
  await page.goto(`http://localhost:${config.webServer?.port}`)
  /**
   * My app automatically signs users in when they don't exist.
   * You'll need to seed a user and update this username if
   * you have a separate registration process.
   */
  await page
    .getByRole('textbox', { name: 'Your email address' })
    .type('user@example.com')
  await page.getByRole('button', { name: 'Email me a login link' }).click()
  await browser.close()
}

export default globalSetup
We’ve not logged in yet; however, if you access your local InBucket URL, you should see an email waiting in there which looks like this:
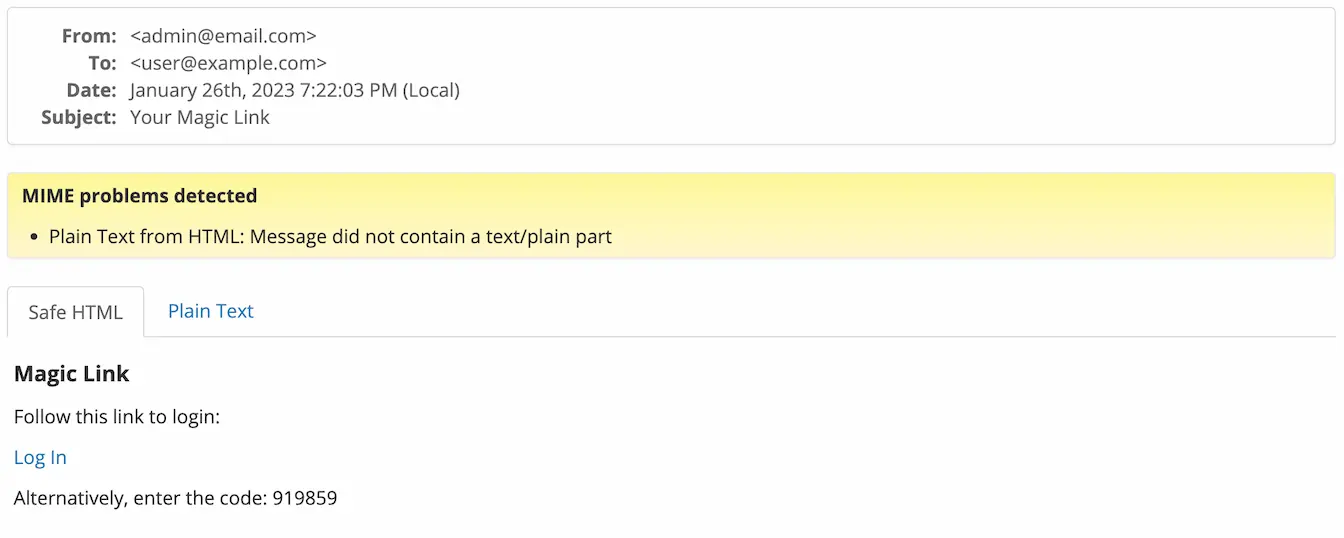
We need to programmatically retrieve this email, extract the login link or OTP and complete the next step of the login form.
To help us with this, InBucket exposes the following REST endpoints:
/api/v1/mailbox/{username}- lists all of the messages for{username}/api/v1/mailbox/{username}/{message_id}- fetches a full message for{username}by it’s ID ({message_id})
Let’s write a function that will allow us to retrieve the latest message for a user and extract the login link and OTP.
import { chromium, request, type FullConfig } from '@playwright/test'

const getLoginMessage = async (username: string) => {
  const requestContext = await request.newContext()
  const messages = await requestContext
    .get(`${process.env.INBUCKET_URL}/api/v1/mailbox/${username}`)
    .then((res) => res.json())
    // InBucket doesn't have any params for sorting, so here
    // we're sorting the messages by date
    .then((items) =>
      [...items].sort((a, b) => {
        if (a.date < b.date) {
          return 1
        }

        if (a.date > b.date) {
          return -1
        }

        return 0
      })
    )

  // As we've sorted the messages by date, the first message in
  // the `messages` array will be the latest one
  const latestMessageId = messages[0]?.id

  if (latestMessageId) {
    const message = await requestContext
      .get(
        `${process.env.INBUCKET_URL}/api/v1/mailbox/${username}/${latestMessageId}`
      )
      .then((res) => res.json())

    // We've got the latest email. We're going to use regular
    // expressions to match the bits we need.
    const token = message.body.text.match(/enter the code: ([0-9]+)/)[1]
    const url = message.body.text.match(/Log In \( (.+) \)/)[1]

    return { token, url }
  }

  return {
    token: '',
    url: '',
  }
}
We could start using this function immediately; we’ll trigger the magic login link email to be sent, get the OTP from the email, and continue the rest of the login process.
To finish, we’ll also save the current page context to storage-state.json -
this means Playwright can use this login session across multiple tests.
async function globalSetup(config: FullConfig) {
  // ...beginning of function
  await page.getByRole('button', { name: 'Email me a login link' }).click()
  const { token } = await getLoginMessage('user')
  await page.getByRole('textbox', { name: 'One-time password' }).type(token)
  await page
    .getByRole('button', { name: 'Login with one-time password' })
    .click()
  await page.getByText('Protected content for user@example.com').waitFor()
  await page.context().storageState({ path: 'storage-state.json' })
  await browser.close()
}
You’ll find this is flaky; in the worst case, it doesn’t work. Supabase sends the email asynchronously, there’s a tiny delay, and we can’t guarantee the time between triggering the email and when we try to finish logging in. We may use an old login link, or the user’s mailbox may be empty.
A workaround for this might be hardcoding a delay of a few hundred milliseconds. To avoid flaky tests, I wrote a function that’ll wait for a new email before continuing.
const waitForNewToken = async (oldToken: string, username: string) => {
  let triesLeft = 5
  return new Promise<Awaited<ReturnType<typeof getLoginMessage>>>(
    (resolve, reject) => {
      const interval = setInterval(async () => {
        const check = await getLoginMessage(username)
        if (check.token !== oldToken) {
          resolve(check)
          clearInterval(interval)
        } else if (triesLeft <= 1) {
          reject()
          clearInterval(interval)
        }
        triesLeft--
      }, 100)
    }
  )
}
Essentially, this will poll InBucket every 100ms (with a retry limit of 5) until
it receives a new token. The oldToken is retrieved at the start of the setup
function and will either be the default empty string (if the mailbox is empty)
or the token from the last login attempt.
We can use waitForNewToken in our setup function and completed, it looks like
this:
async function globalSetup(config: FullConfig) {
  const { token: oldToken } = await getLoginMessage()
  const browser = await chromium.launch()
  const page = await browser.newPage()
  await page.goto(`http://localhost:${config.webServer?.port}`)
  await page
    .getByRole('textbox', { name: 'Your email address' })
    .type('user@example.com')
  await page.getByRole('button', { name: 'Email me a login link' }).click()
  const { token } = await waitForNewToken(oldToken)
  await page.getByRole('textbox', { name: 'One-time password' }).type(token)
  await page
    .getByRole('button', { name: 'Login with one-time password' })
    .click()
  await page.getByText('Protected content for user@example.com').waitFor()
  await page.context().storageState({ path: 'storage-state.json' })
  await browser.close()
}
We can also create a small test to verify this is working as expected 🎉
import { expect, test } from '@playwright/test'

test('can login', async ({ page }) => {
  await page.goto('/')
  await expect(
    page.getByText('Protected content for user@example.com')
  ).toBeVisible()
})
Running the tests in CI
I run my tests using GitHub Actions, but the configuration will be similar for most CI providers. Please refer to your provider’s documentation. My job looks like this:
playwright:
name: ✍️ Playwright
runs-on: ubuntu-latest
strategy:
fail-fast: false
matrix:
shardIndex: [1, 2]
shardTotal: [2]
steps:
- name: 🛑 Cancel Previous Runs
uses: styfle/cancel-workflow-action@0.11.0
with:
access_token: ${{ github.token }}
- name: ⬇️ Checkout repo
uses: actions/checkout@v3
- name: 🏄 Copy test env vars
run: cp .env.example .env
- name: ⎔ Setup node
uses: actions/setup-node@v3
with:
node-version: 16
- name: 📥 Download deps
uses: bahmutov/npm-install@v1
- name: 🕸 Install Playwright browsers
run: npx playwright install --with-deps
- name: 👩💻 Setup Supabase CLI
uses: supabase/setup-cli@v1
with:
version: latest
- name: 🗃️ Start Supabase
run: supabase start && supabase db reset
- name: ✅ Playwright
env:
INBUCKET_URL: http://localhost:54324
run: npx playwright test --shard=${{ matrix.shardIndex }}/${{ matrix.shardTotal }}
Summary
We’ve covered a lot of ground with our testing setup:
- Got a local Supabase instance running both locally and in CI
- Figured out how to send and grab emails locally through Supabase
- Built a Playwright global setup function that handles user authentication before any tests run
- Ran a quick test to make sure everything plays nicely together
Now you can go ahead and test the rest of your app. Just heads up - if you need to test parts of your app that don’t require authentication, this global setup might get in the way. You can always create a separate test suite that skips the setup function for those scenarios.